Menu
-
- Home
-
Woodworking Silicone Molds
-
Floral/Preservation Silicone Molds
- 2" & 3" Deep Alphabet Letter Molds
- 3" - 1.5" Deep Picture Frame Molds
- 3" Deep Hexagon Silicone Molds
- 3" Deep Square Molds
- 3" Deep Bookend Molds
- 3" Deep Arch Mold
- 3" Deep Heart Mold
- Deep Gem Molds
- 1.25", 2" & 3" Deep Cross Molds
- Memorials/Remembrance
- 3" Deep Rectangle Silicone Molds
- 3" Deep Large Round & Oval Molds
- 3" Deep Standing Round and Oval Molds
- 3" Deep Rainbow Molds
- 1.25" Deep Charcuterie Board Mold
- 1" - 2" Deep Square Molds
- 1" - 2" Deep Rectangle Molds
- 2" Deep Round Molds
- Specialty/Holiday
- 1" Deep Coaster Molds
- Paper Weight Molds
- Ornament Molds - Donut & Round
- 1/2" & 3/4" Serving Tray Molds
- Add-Ons/Functional Molds
- Resin Tools & Accessories
-
Arts & Crafts, Trays, Keychains, 3D, and more
-
Eye Candy Pigments
- Promise Epoxy
- Clearance - B Grade
-
- Contact Us
- Login
-
USD


Say Goodbye to Bubbles: The Secret Tool Every Resin Artist Needs for Crystal-Clear Projects!
November 19, 2024 3 min read
The Benefits of Vacuum Chambers in Epoxy Resin Projects
When working with epoxy resin, achieving crystal-clear results can sometimes feel like a challenge, especially when pesky bubbles pop up in your finished project. If you’re looking to take your resin work to the next level, a vacuum chamber might just be your new best friend. Let’s explore how this invaluable tool can transform your projects by improving clarity and eliminating bubbles.
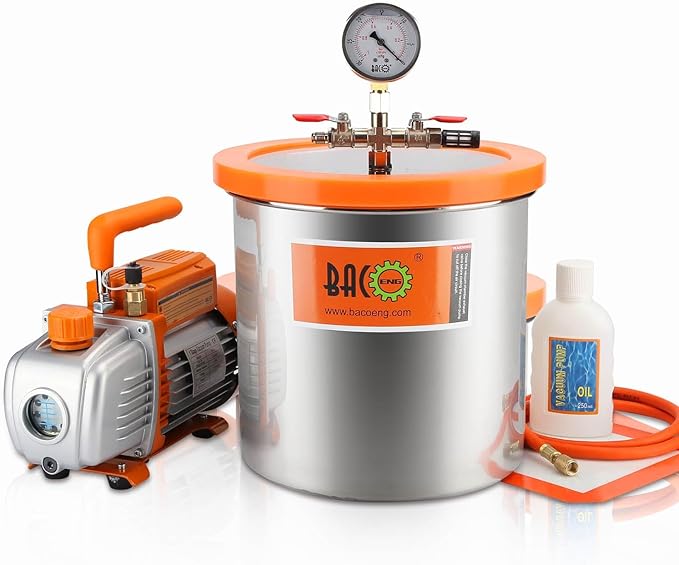
What is a Vacuum Chamber?
A vacuum chamber is a sealed container used to remove air and other gases from materials. When connected to a vacuum pump, it creates a low-pressure environment that causes trapped air to rise to the surface and escape, leaving you with a bubble-free result.
How Does a Vacuum Chamber Benefit Epoxy Resin Projects?
1. Removes Air Bubbles Before Pouring
One of the main challenges with epoxy resin is the formation of air bubbles during mixing. These bubbles can ruin the clarity of your project or get trapped in delicate designs. By placing your mixed resin in a vacuum chamber, you can:
- Eliminate microbubbles that may not be visible until the resin cures.
- Ensure smooth and consistent resin flow when pouring into molds.
2. Enhances Clarity
Crystal-clear resin is essential for projects like floral preservation, river tables, and jewelry making. A vacuum chamber removes the tiny air pockets that can cloud your resin, giving it a flawless, glass-like finish.
3. Improves Adhesion in Embedded Designs
When embedding items like flowers, wood, or objects into resin, trapped air can form around the embedded pieces, causing bubbles or uneven adhesion. A vacuum chamber:
- Ensures the resin penetrates every crevice of the embedded item.
- Reduces the chance of bubbles forming after pouring.
4. The Most Affordable Way to Improve Floral Preservation Clarity
If you’re working with preserved flowers, clarity is key. Resin often traps air within delicate petals, creating bubbles that distract from the beauty of your piece. Using a vacuum chamber is one of the most affordable and effective ways to achieve professional-level clarity without needing expensive alternatives. This makes it a must-have tool for floral preservation artists at any level.
5. Saves Time and Effort
While heat guns and torches can remove bubbles from the surface of resin, they often require extra time and can’t address bubbles deep within the material. A vacuum chamber removes bubbles uniformly, saving you the hassle of constant monitoring and touch-ups.
Tips for Using a Vacuum Chamber with Epoxy Resin
- Don’t Overfill the Chamber: Resin expands as air escapes, so leave enough room for it to rise without overflowing.
- Choose the Right Timing: Place the resin in the vacuum chamber immediately after mixing but before it begins to thicken or cure.
- Watch the Pressure: Slowly increase the vacuum to prevent resin from boiling over.
- Combine with a Pressure Pot: For complex molds or deep pours, using a pressure pot after vacuuming ensures the best results.
Ready to Get Started?
Investing in a vacuum chamber is a game-changer for resin artists and floral preservation enthusiasts. Not only does it improve clarity and eliminate bubbles, but it’s also a budget-friendly tool that elevates your craft to professional standards.
Click here to shop for vacuum chambers and start achieving flawless results in your epoxy resin projects today!
Leave a comment
Comments will be approved before showing up.
Sign up for new products alerts and discounts!
Sign up below!